Civil 3D: Profiles and Profile Views လေ့ကျင့်ခန်း
AutoCAD Civil 3D Training Myanmar ကနေ Civil 3D software မှာ profile and profile view ဖန်တီးနိုင်ဖို့ ဆက်လက်မျှဝေပေးပါရစေ။
ယခင်သင်ခန်းစာ မှ အဆက်ဖြစ်ပါသည်။ ယခင်သင်ခန်းစာကို ကြည့်လိုပါက ဒီကို နှိပ်ပါ။
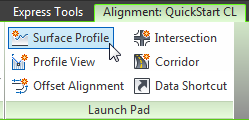
အခု alignment ကနေ profile ထုတ်ယူပါမယ်။ အစိမ်းရောင် Centerline Alignment ကို select လုပ်ပြီး ပေါ်လာတဲ့ Alignment contextual tab မှာ Launch Pad > Surface Profile ကို ကလစ်နှိပ်ပါ။
ထပ်ပေါ်လာတဲ့ Create Profile from surface dialog မှာ Add ကိုနှိပ်ပြီး Draw In Profile View ဆက်နှိပ်ပါ။
Create Profile View – General dialog Box ပေါ်လာပါမယ်။ အဲမှာပါတဲ့ Create Profile View ကို ကလစ်နှိပ်ပြီး Site ရဲ့မြောက်ဖက် Surface area လွတ်တဲ့နေရာမှာ ကလစ်ချလိုက်ပါ ။ Alignment တလျှောက်မှာ ရှိတဲ့ Surface Profile ရပါပြီ။
အခုဆက်ပြီးတော့ Design Profile ဆက်ဆွဲပါမယ်။ Home Tab > Create Design Panel > Profile » Create Best Fit Profile ကို ကလစ်နှိပ်ပါ။
Profile
View ကိုရွေးချယ်ဖို့ Command Window မှာ ပေါ်လာရင် အရင်သင်ခန်းစာမှာလုပ်ထားတဲ့ Profile View က Grid Line တခုကို ကလစ်လုပ်ပေးပါ။ Create Best fit Profile dialog ပေါ်လာရင် ဒါလေးတွေဆက်လုပ်ပါမယ်။ က » Input type မှာ Surface Profile ကိုရွေးပါ။ Surface Profile အကွက်မှာ Existing Surface ရွေးပြီးသားပေါ်လာပါမယ်။
ခ » Profile name ကို QuickStart Profile လို့ပေးပြီး Profile Style မှာ Design Profile ရွေးပေးပါ။
ဂ » Show Report check
box မှာ အမှန်ခြစ်ဖြုတ်ပြီး အိုကေနှိပ်ပါ။
တင်သမျှဖိုင်များကို မဒေါင်းသေးပဲ ကိုယ်ပိုင်သိမ်းဆည်းထားလိုပါက Pcloud အကောင့်ဖွင့်ရန် ဒီကိုနှိပ်ပါ။
Premium Account တလ အစမ်းသုံးချင်ပါက ဒီလင့်ကိုနှိပ်ပြီး အကောင့်ဖွင့်ပါ။ တင်သမျှကို လက်မလွတ်ပဲ ကြည့်ရှုနိုင်ရန် အီးမေးလ် subscribe လုပ်ထားနှိင်ပါသည်။
Pcloud Storage ဝယ်လိုပါက ဒီလင့်ကိုနှိပ်ပြီး ဝယ်ယူနိုင်ပါသည်။


Comments
Post a Comment